Dynamics 365: Generate Early Bound Entity Classes With Azure DevOps
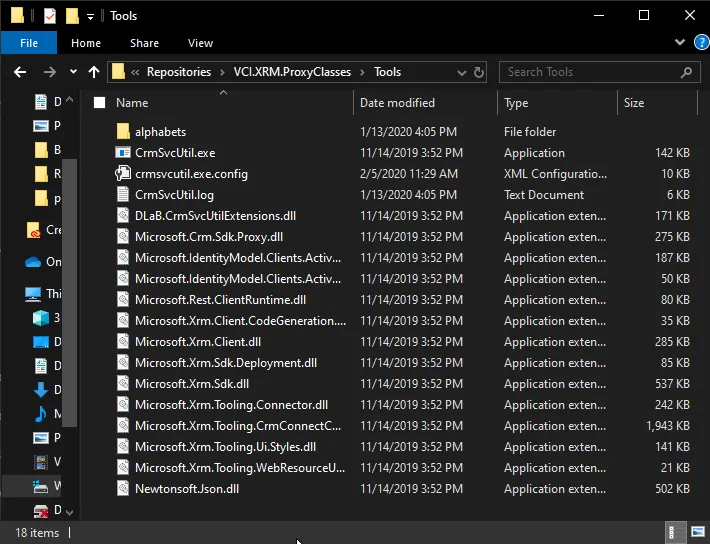
Within the wonderful collection of tools XrmToolBox is a tool we use quite frequently for Dynamics 365. It’s called Early Bound Generator and its purpose is to create C# classes that you can reference in your .NET libraries, plugins, command line applications, whatever you want. It’s pretty great and saves us from the headache of magic strings. If you’re like me, however, you run it at least twice a day when you’re in active development. When you’re using the classes across multiple projects, maintenance becomes tedious at best. My solution to the issue is to create an Azure DevOps pipeline to automatically generate, commit, build, and publish the classes to a private NuGet feed using DevOps Artifacts. Intrigued? Good. The first thing you’ll need to do is create a repository in DevOps for the proxy classes. Then, download XrmToolBox and install the Early Bound Generator plugin. Once installed, you’ll need to browse to %appdata%\MscrmTools\XrmToolBox\Plugins\DLaB.EarlyBoundGenerator and copy everything in this folder to a “Tools” folder in your git repository. You should have the following:
In the root of your repository, you should create a solution and add a .NET Framework 4.6.1 class project. You need to change the includes portion of the .csproj to include all .cs files. You will also have to install the packages Microsoft.Crm.Sdk.Proxy and Microsoft.Xrm.Sdk from NuGet. My .csproj looks something like this:
    <?xml version="1.0" encoding="utf-8"?>
    <Project ToolsVersion="15.0" xmlns="http://schemas.microsoft.com/developer/msbuild/2003">
      <Import Project="$(MSBuildExtensionsPath)\$(MSBuildToolsVersion)\Microsoft.Common.props" Condition="Exists('$(MSBuildExtensionsPath)\$(MSBuildToolsVersion)\Microsoft.Common.props')" />
      <PropertyGroup>
        <Configuration Condition=" '$(Configuration)' == '' ">Debug</Configuration>
        <Platform Condition=" '$(Platform)' == '' ">AnyCPU</Platform>
        <ProjectGuid>{88105253-23F3-4BB0-94B1-D3631C452593}</ProjectGuid>
        <OutputType>Library</OutputType>
        <AppDesignerFolder>Properties</AppDesignerFolder>
        <RootNamespace>VCI.XRM.ProxyClasses</RootNamespace>
        <AssemblyName>VCI.XRM.ProxyClasses</AssemblyName>
        <TargetFrameworkVersion>v4.6.1</TargetFrameworkVersion>
        <FileAlignment>512</FileAlignment>
        <Deterministic>true</Deterministic>
        <TargetFrameworkProfile />
      </PropertyGroup>
      ...
      <ItemGroup>
        <Compile Include="**\*.cs" />
      </ItemGroup>
    </Project>
Now we’re going to move over to DevOps. Go over and install the Dynamics 365 Build Tools from the Azure Pipelines marketplace. Next, make a new pipeline in DevOps. I’ve done mine in the classic interface as I have a general hatred for YAML, but I’m positive you could do it all in that as well. We’ll do a dive into all of the options, but here’s what mine looks like: 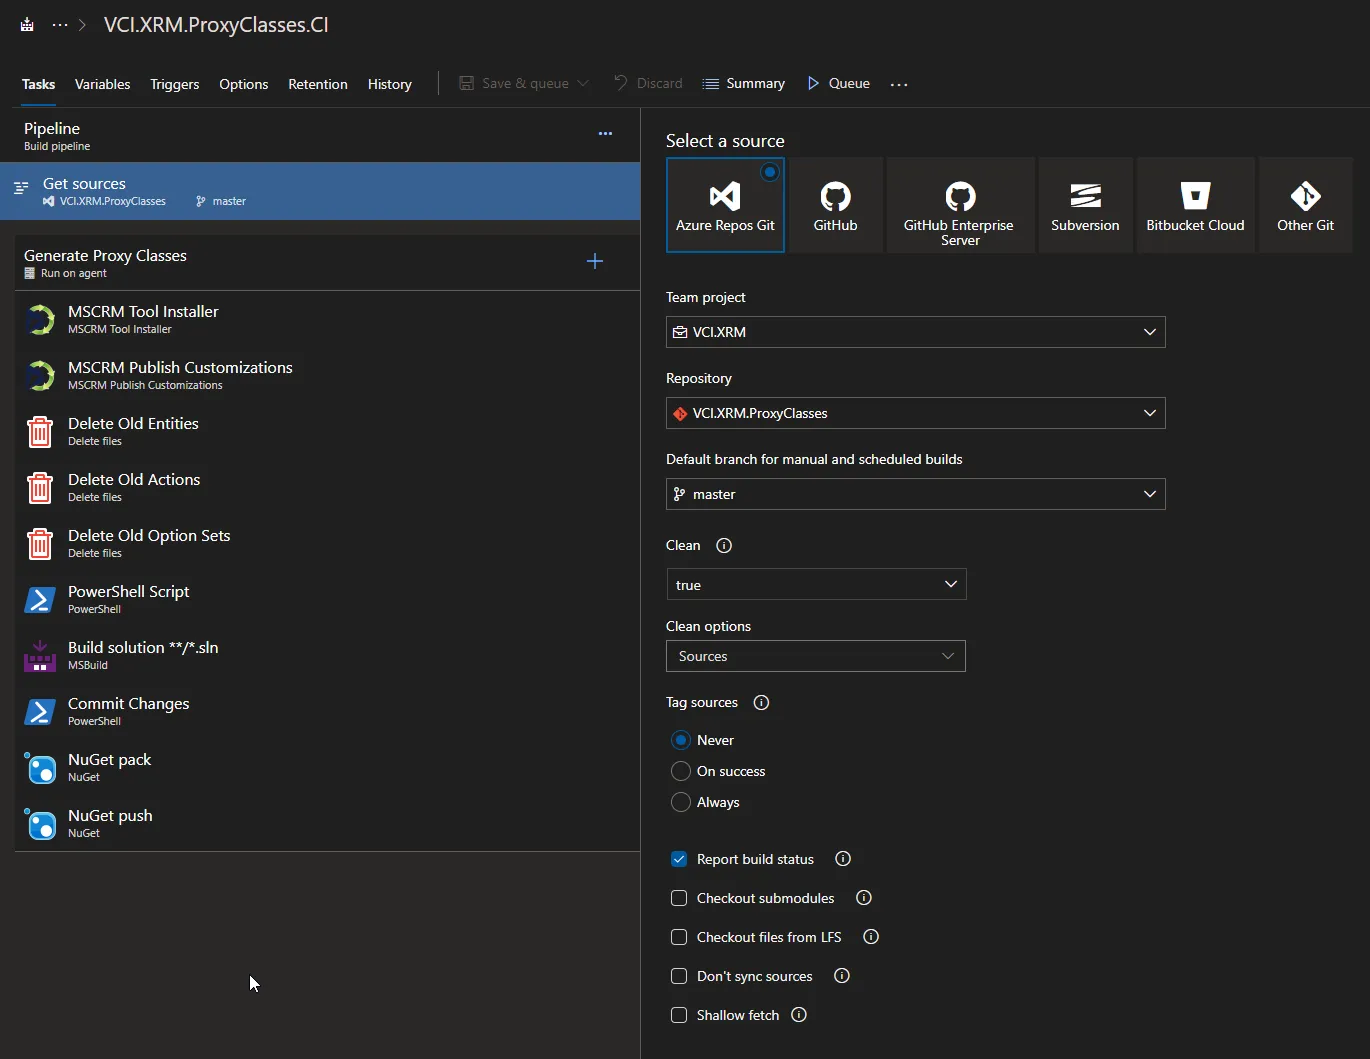
Make a new agent job (I’ve named mine “Generate Proxy Classes”) and make sure you check the “Allow scripts to access the OAuth token”. If you don’t do this, git will yell at you for not having permissions to the repository. 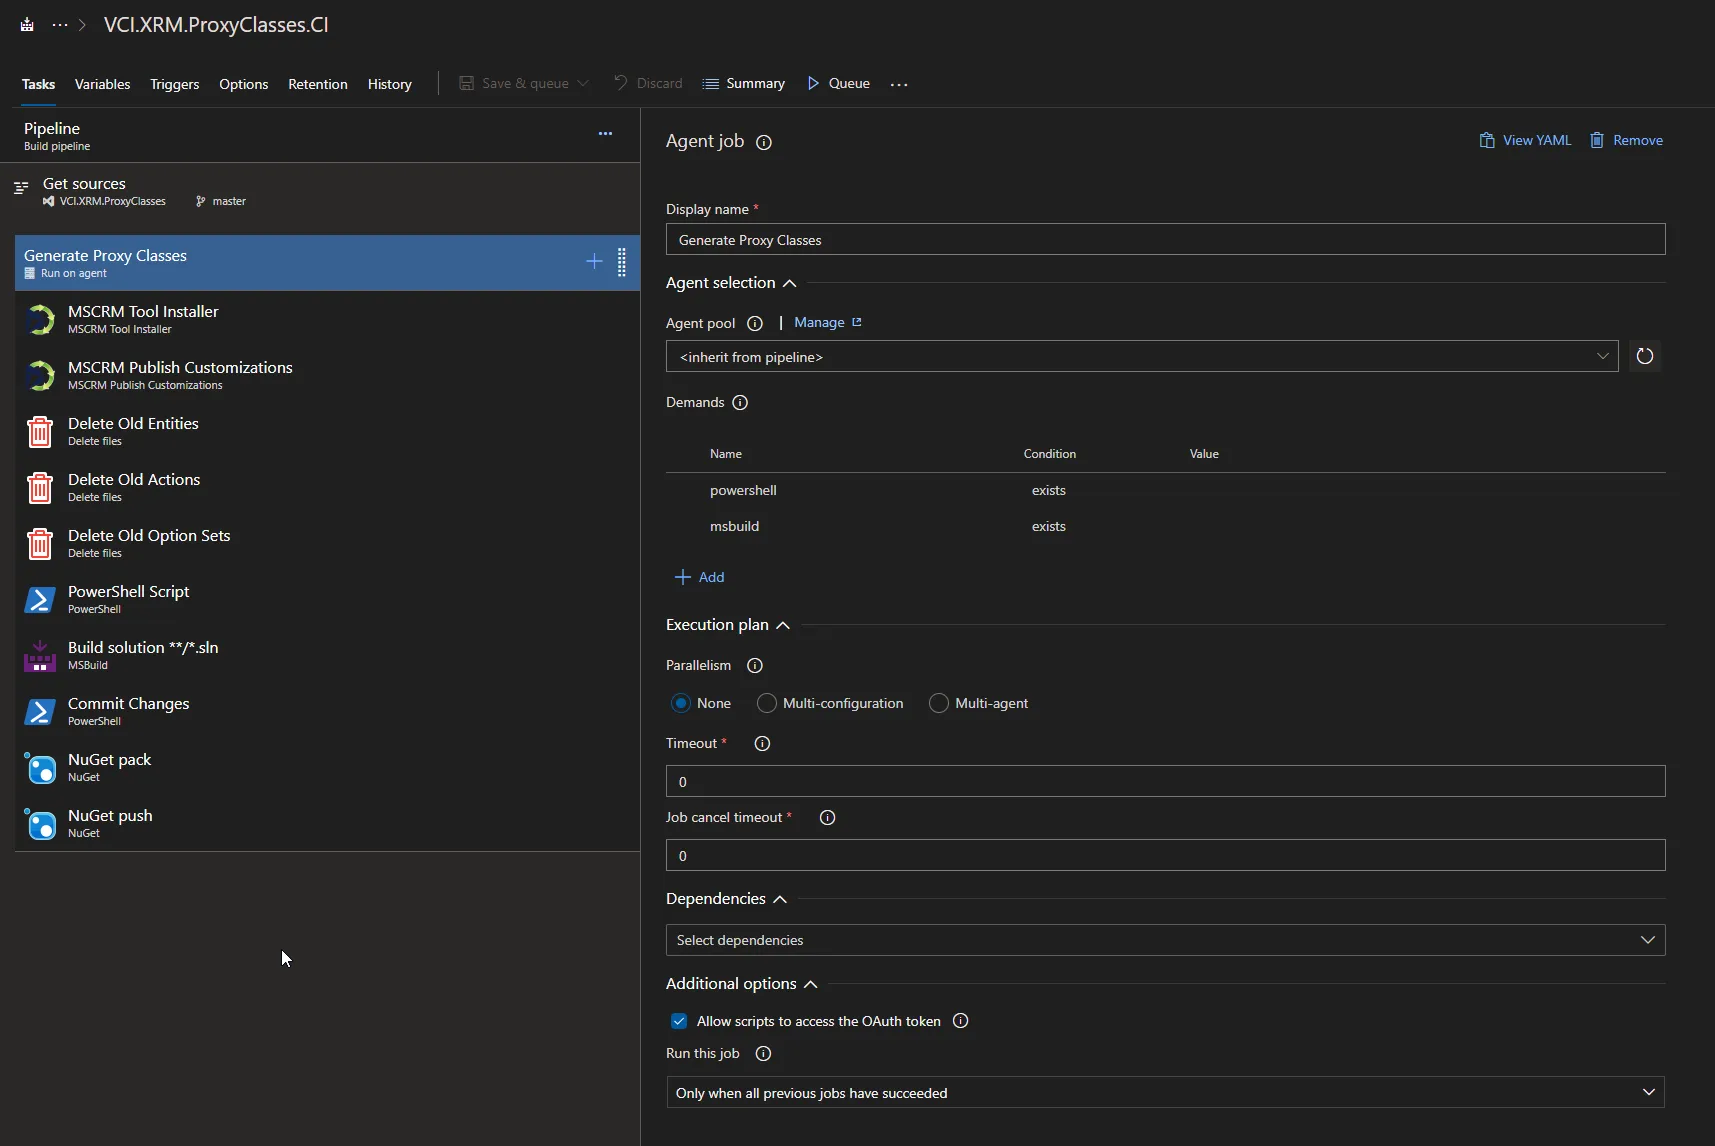
Now add the “MSCRM Tool Installer” task. There is nothing to configure on this one. Next, add the “MSCRM Publish Customizations” task. This isn’t required, but it’s generally a good idea. Under your “CRM Connection String” parameter, we’re going to want to reference an environment variable. Mine is named VCI.XRM.Dev.ConnectionString, but you can really call it whatever you want. 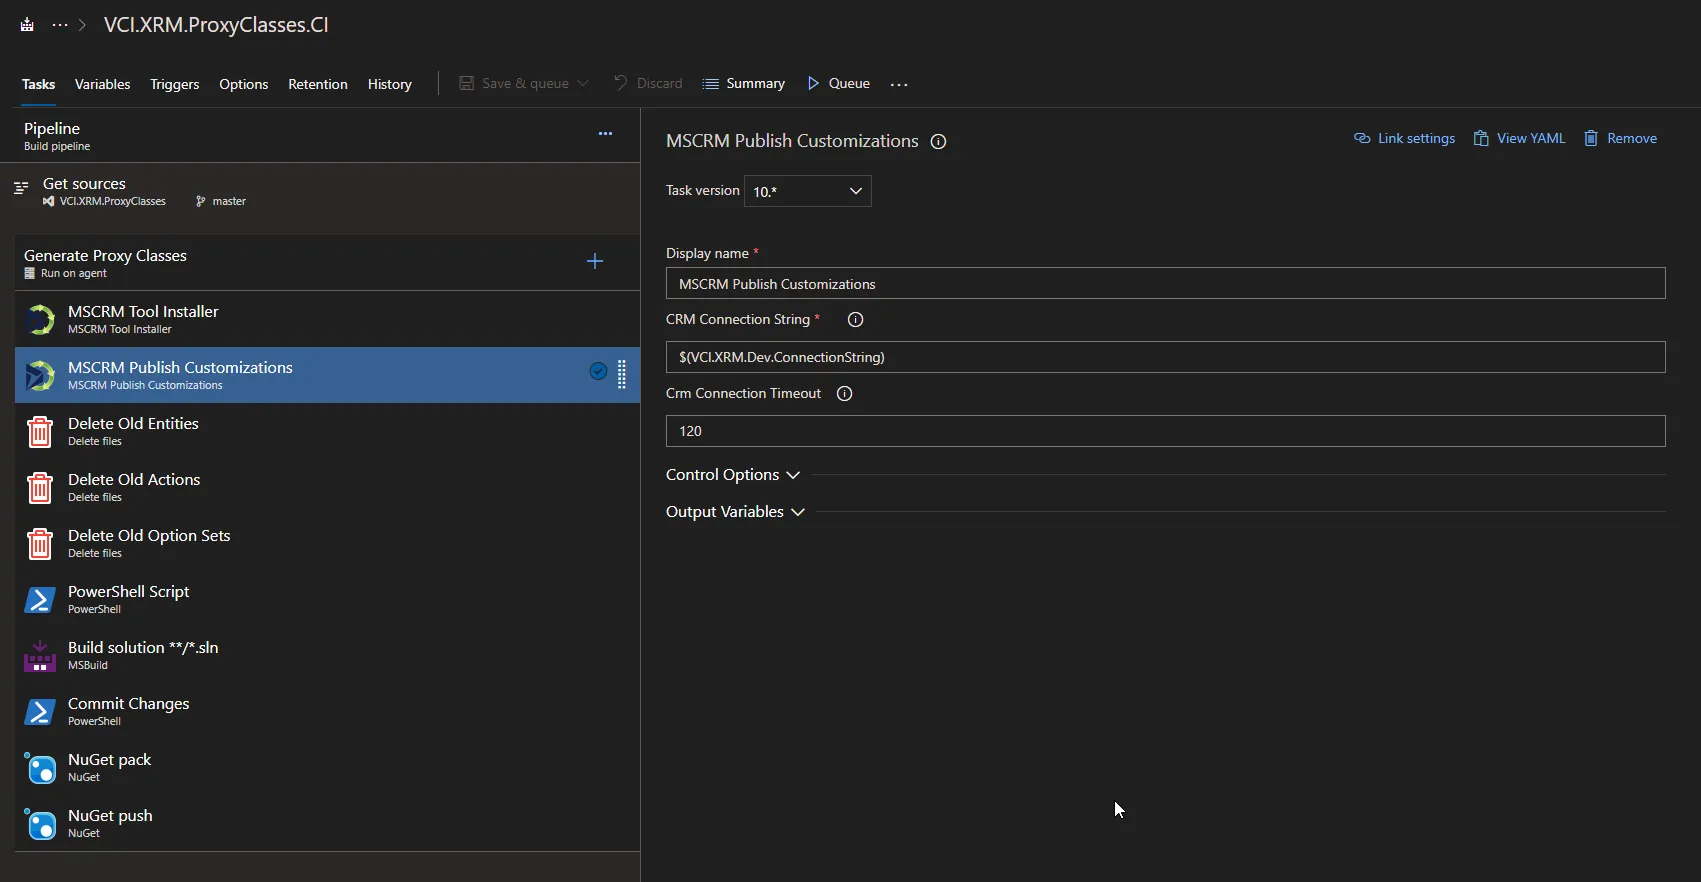
I added three tasks for deleting out the old classes that were generated. The class generator can be set to do this, so you probably don’t need to do it. They’re all the same, I just delete the contents of Entities, Actions, and Option Sets folders: 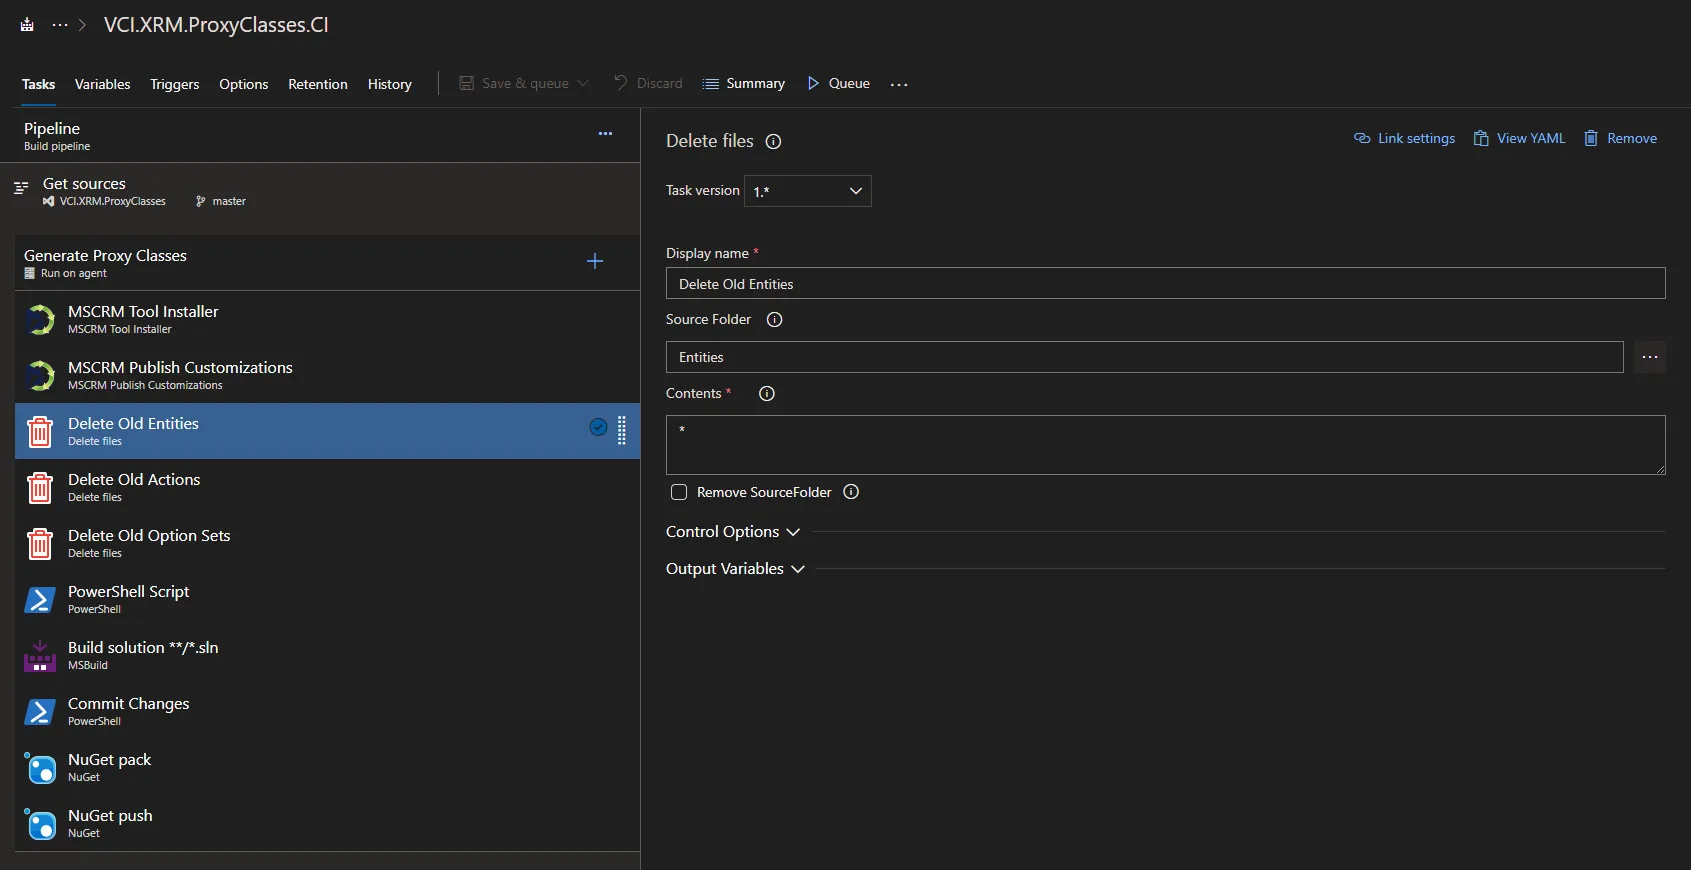
Next, add a PowerShell Script task. We’ll be doing it inline. As with the connection string parameter from the publish step, change your environment variable names to whatever you want. Make sure to change the namespace too! 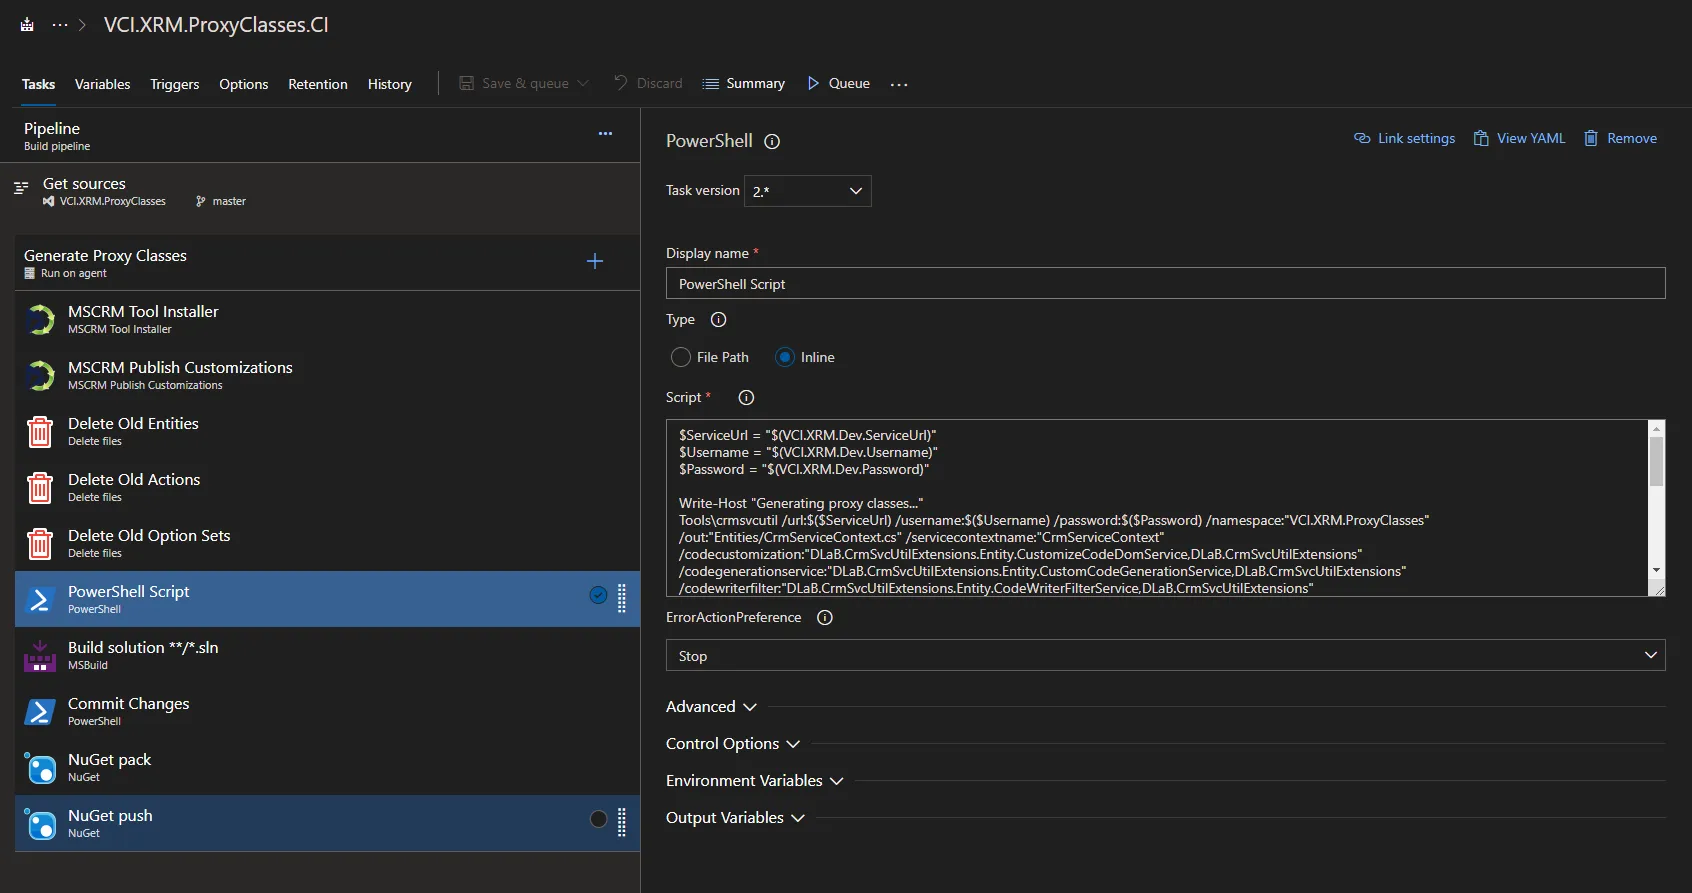
And here’s the full script for that:
    $ServiceUrl = "$(VCI.XRM.Dev.ServiceUrl)"
    $Username = "$(VCI.XRM.Dev.Username)"
    $Password = "$(VCI.XRM.Dev.Password)"

    Write-Host "Generating proxy classes..."
    Tools\crmsvcutil /url:$($ServiceUrl) /username:$($Username) /password:$($Password) /namespace:"VCI.XRM.ProxyClasses" /out:"Entities/CrmServiceContext.cs" /servicecontextname:"CrmServiceContext" /codecustomization:"DLaB.CrmSvcUtilExtensions.Entity.CustomizeCodeDomService,DLaB.CrmSvcUtilExtensions" /codegenerationservice:"DLaB.CrmSvcUtilExtensions.Entity.CustomCodeGenerationService,DLaB.CrmSvcUtilExtensions" /codewriterfilter:"DLaB.CrmSvcUtilExtensions.Entity.CodeWriterFilterService,DLaB.CrmSvcUtilExtensions" /namingservice:"DLaB.CrmSvcUtilExtensions.NamingService,DLaB.CrmSvcUtilExtensions" /metadataproviderservice:"DLaB.CrmSvcUtilExtensions.Entity.MetadataProviderService,DLaB.CrmSvcUtilExtensions"

    Write-Host "Generating actions..."
    Tools\crmsvcutil /url:$($ServiceUrl) /username:$($Username) /password:$($Password) /namespace:"VCI.XRM.ProxyClasses" /out:"Actions\Actions.cs" /codecustomization:"DLaB.CrmSvcUtilExtensions.Action.CustomizeCodeDomService,DLaB.CrmSvcUtilExtensions" /codegenerationservice:"DLaB.CrmSvcUtilExtensions.Action.CustomCodeGenerationService,DLaB.CrmSvcUtilExtensions" /codewriterfilter:"DLaB.CrmSvcUtilExtensions.Action.CodeWriterFilterService,DLaB.CrmSvcUtilExtensions" /metadataproviderservice:"DLaB.CrmSvcUtilExtensions.BaseMetadataProviderService,DLaB.CrmSvcUtilExtensions"

    Tools\crmsvcutil /url:$($ServiceUrl) /username:$($Username) /password:$($Password) /namespace:"VCI.XRM.ProxyClasses" /out:"OptionSets\OptionSets.cs" /codecustomization:"DLaB.CrmSvcUtilExtensions.OptionSet.CustomizeCodeDomService,DLaB.CrmSvcUtilExtensions" /codegenerationservice:"DLaB.CrmSvcUtilExtensions.OptionSet.CustomCodeGenerationService,DLaB.CrmSvcUtilExtensions" /codewriterfilter:"DLaB.CrmSvcUtilExtensions.OptionSet.CodeWriterFilterService,DLaB.CrmSvcUtilExtensions" /namingservice:"DLaB.CrmSvcUtilExtensions.NamingService,DLaB.CrmSvcUtilExtensions" /metadataproviderservice:"DLaB.CrmSvcUtilExtensions.BaseMetadataProviderService,DLaB.CrmSvcUtilExtensions"
Next, build the solution using an MSBuild task: 
Now add another PowerShell task, and we’re going to be using another inline script. Modify the user.email and user.name as you see fit: 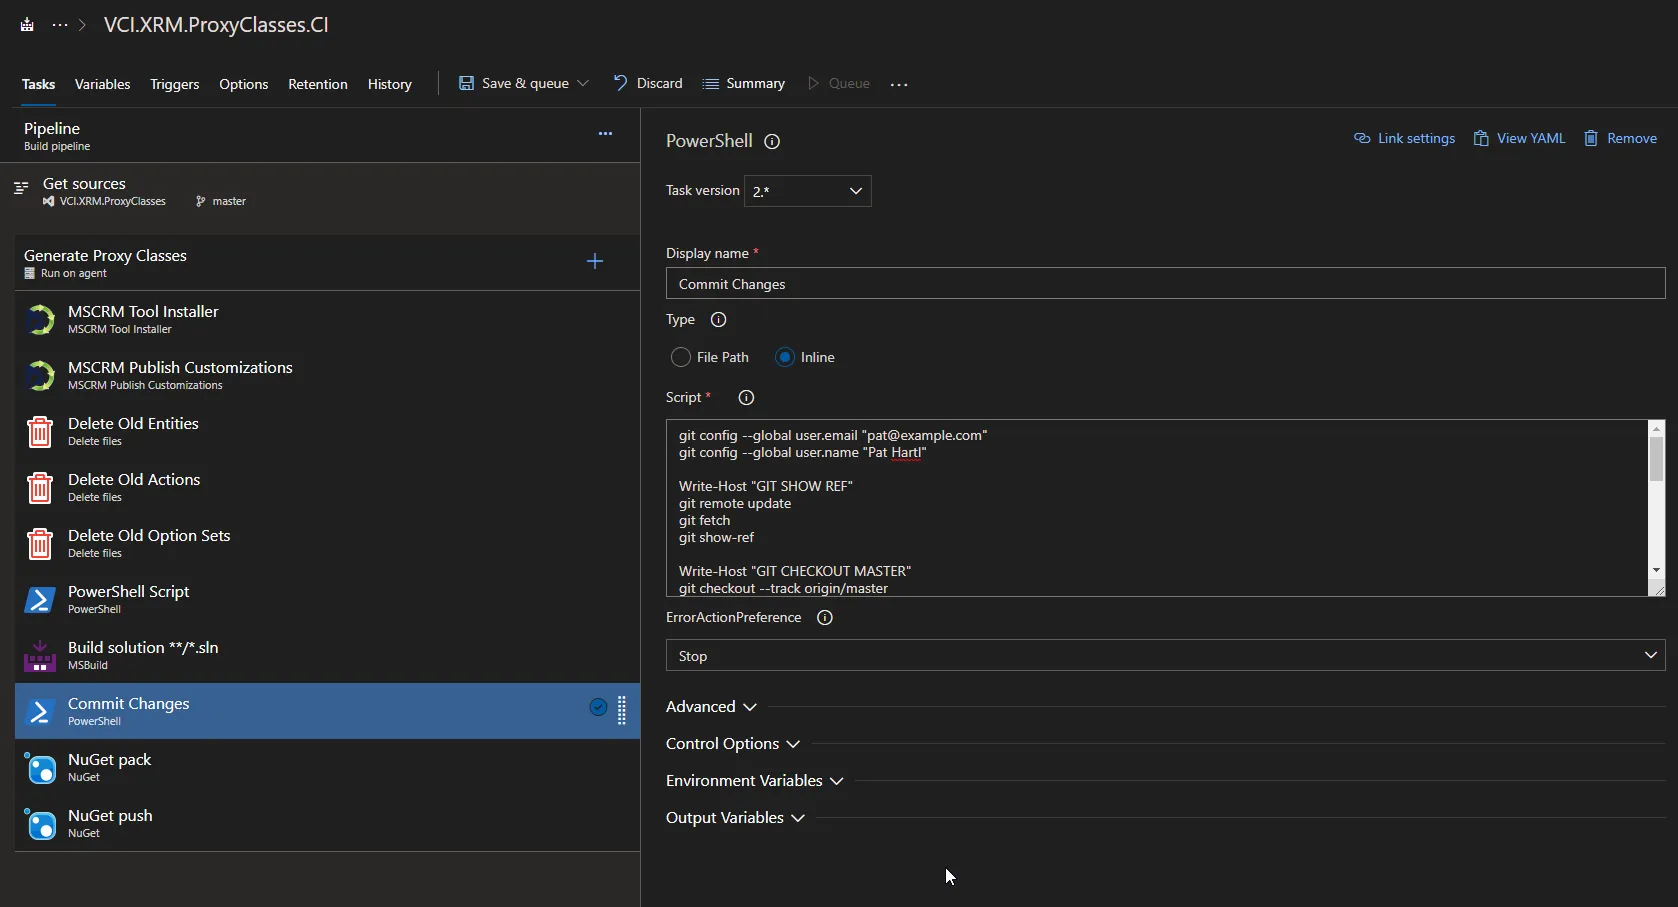
git config --global user.email "[email protected]"
git config --global user.name "Pat Hartl"

Write-Host "GIT SHOW REF"
git remote update
git fetch
git show-ref

Write-Host "GIT CHECKOUT MASTER"
git checkout --track origin/master

Write-Host "GIT STATUS"
git status

Write-Host "GIT ADD"
git add -A

Write-Host "GIT COMMIT"
git commit -a -m "Update of proxy classes"

Write-Host "GIT STATUS"
git status

Write-Host "GIT PUSH"
git push origin
git push --tags origin

Write-Host "GIT STATUS"
git status
Now we need to pack it up for NuGet. I chose to use some automatic versioning so it gets pushed as a prerelease: 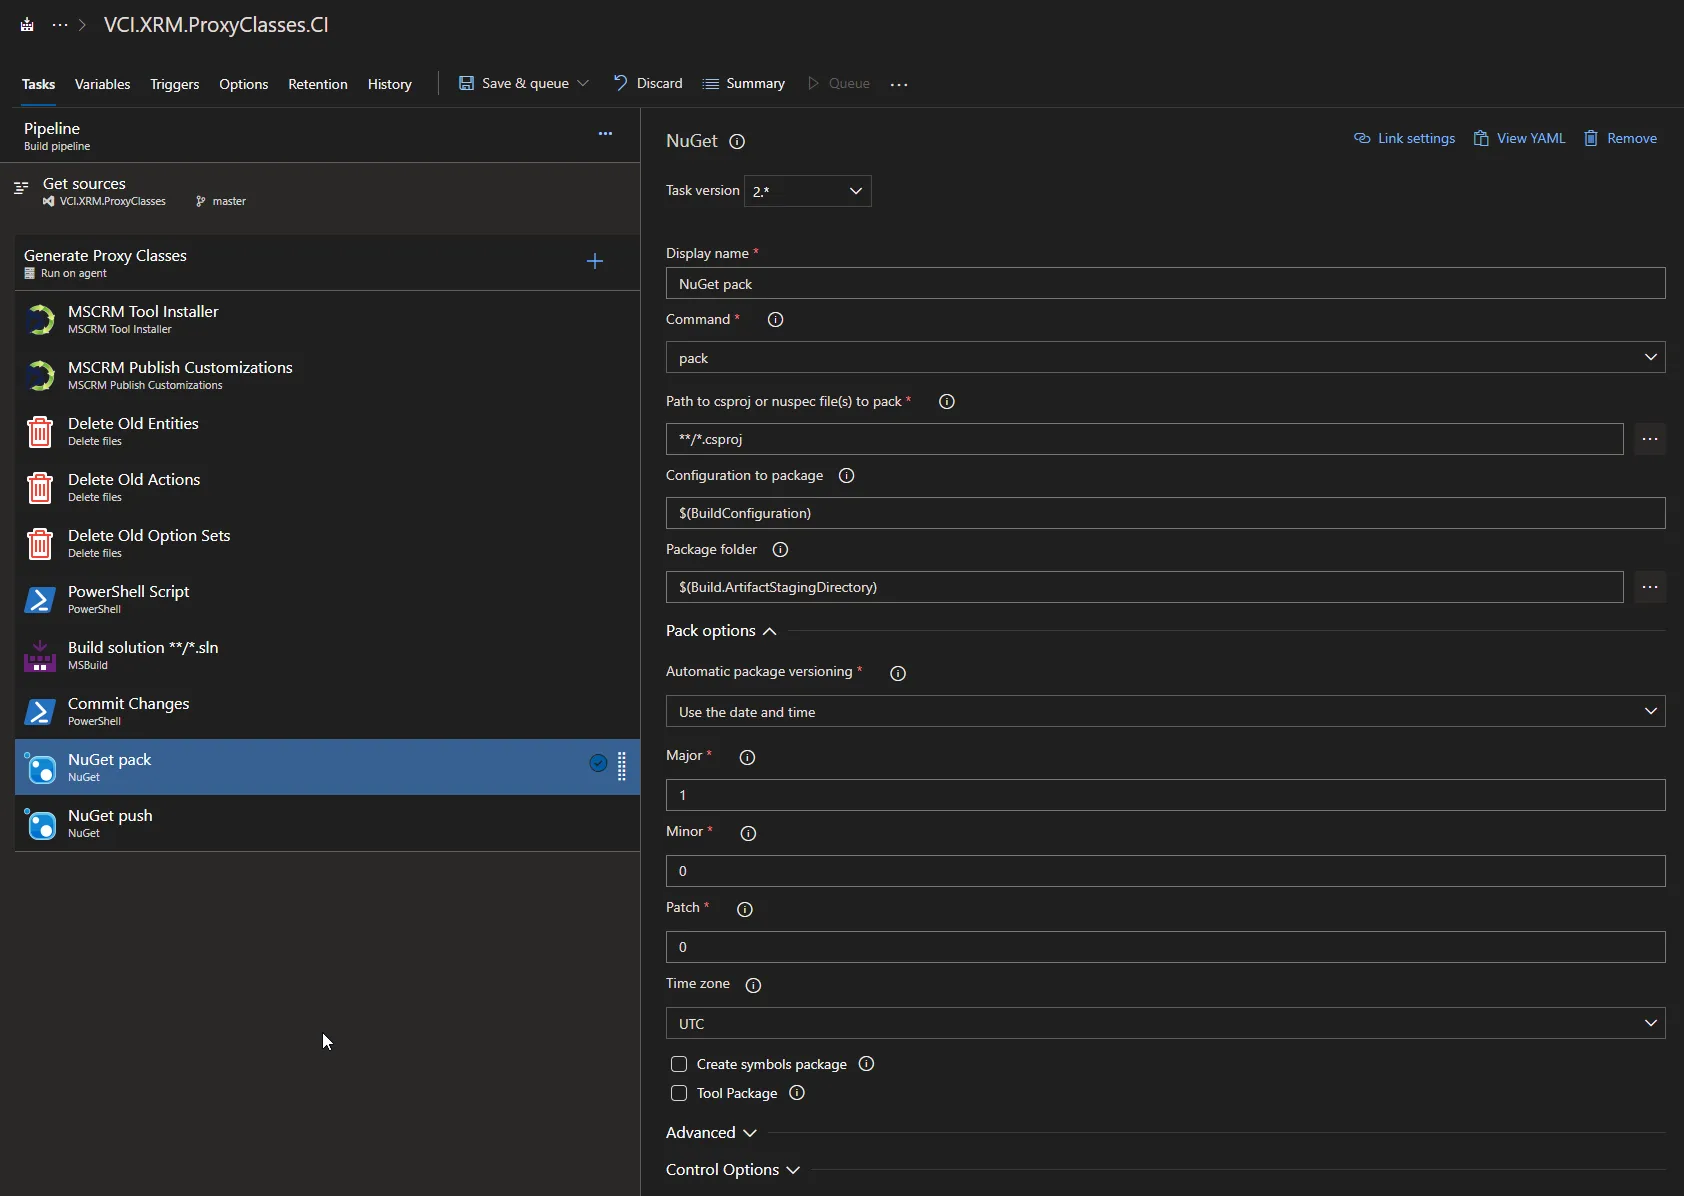
Finally, add a NuGet push task. Make sure to choose the correct target feed! 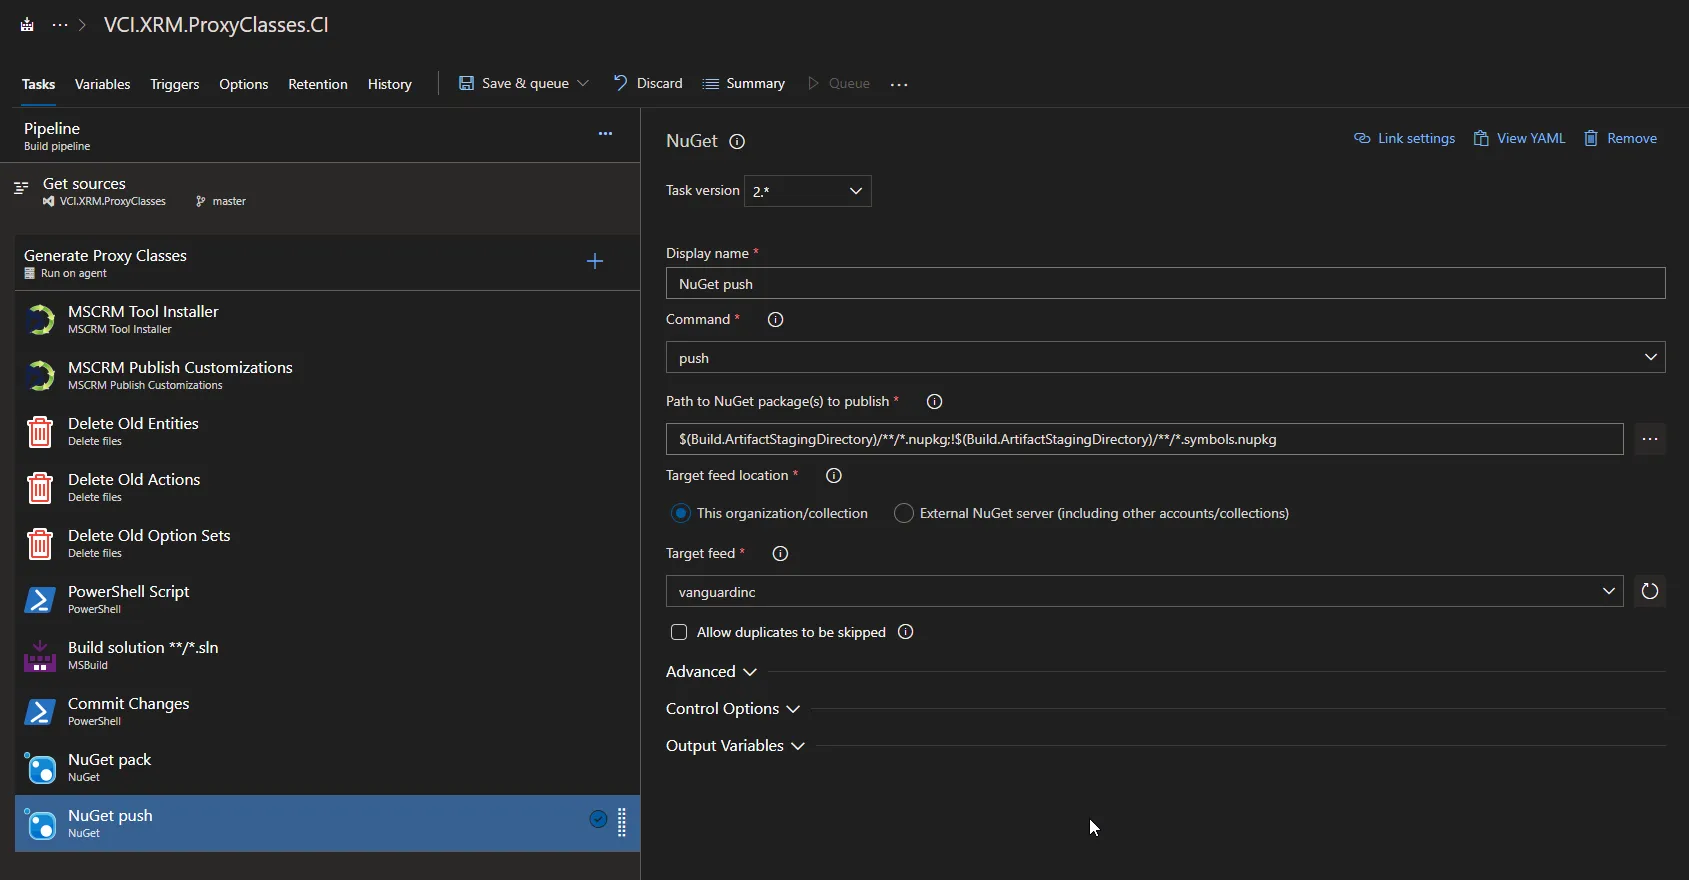
Finally, make sure to configure your environment variables under “Variables” at the top of the page: 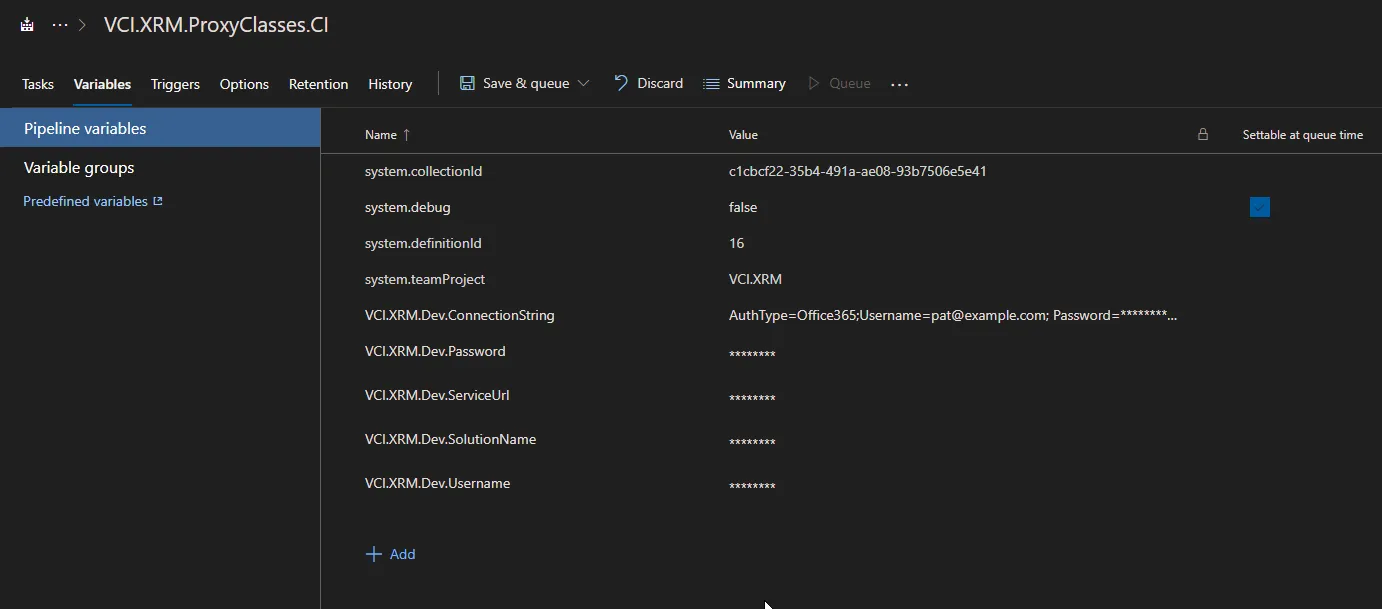
A connection string should look something like:
AuthType=Office365;[email protected]; Password=test1234;Url=https://organization.crm.dynamics.comThe service URL is the Organization Service endpoint address available under Settings / Customizations / Developer Resources in the old Dynamics 365 interface and will look something like:
https://organization.api.crm.dynamics.com/XRMServices/2011/Organization.svcThat’s about it! Run your pipeline and watch it run! Mine takes about 3 minutes to fully execute, but will vary greatly depending on how many entities you have within your solution. If everything runs well, you should be able to see your package available in Visual Studio’s NuGet package manager. If you can’t find it, make sure you’ve added your NuGet feed as a package source within Visual Studio.